Artificial Intelligence
Examining the Transformer Architecture - Part 3: Training a Transformer Model from Scratch in Docker
June 25, 2019
11 min read

In part two of our series, "A Brief Description of How Transformers Work", we explained the technology behind the now infamous GPT-2 at a high level. For our third and final installment, we will dive head-first into training a transformer model from scratch using a TensorFlow GPU Docker image.
Training will be done on our Exxact Valence Workstation using a NVIDIA RTX 2080 Ti. Furthermore, we will create an English to German translator using the transformer model implementation located here on the official TensorFlow GitHub. Assuming you have all the necessary dependencies met for TensorFlow GPU, we provide a simple tutorial guide for getting started with transformers in docker.
Using Docker allows us to spin up a fully contained environment for our training needs. We always recommend using Docker, as it allows ultimate flexibility (and forgiveness) in our training environment. To begin we will open a terminal window and enter the following command to launch our NVIDIA CUDA powered container.
nvidia-docker run -it -p 6007:6006 -v /data:/datasets tensorflow/tensorflow:nightly-gpu bash
Note: A quick description about the key parameters of the above command (if you're unfamiliar with Docker).
| Docker Syntax | Description |
|---|---|
| nvidia-docker run | The 'docker run' command specifies the container from. Note in this case we use ‘nvidia-docker run’ to utilize CUDA powered NVIDIA GPUs. |
| -p 6007:6006 | Expose port 6007 [HOST:CONTAINER] for Tensorboard, type localhost:6007 in your browser to view Tensorboard |
| -v data:/datasets | Volume tag, This shares the folder '/data' on the host machine to the /datasets folder in the container. Also explained as: -v /[host folder]:/[container folder] |
| tensorflow/tensorflow:nightly-gpu | This the docker image that will run. The Docker Hub format is [PUBLISHER]/[IMAGE REPO]:[IMAGE TAG] |
This may be necessary if you are running a fresh docker container.
apt-get install git
In case you do not have the latest up-to-date codebase for the models, the transformer network model is included here and the devs tend to update it quite frequently.
git clone https://github.com/tensorflow/models.git
As a necessary step,this will install the python package requirements for training TensorFlow models.
pip install --user -r official/requirements.txt
Export PYTHONPATH to the folder where the models folder are located on your machine. The command below references where the models are located on our system. Be sure to replace the '/datasets/models' syntax with the data path to the folder where you stored/downloaded your models.
export PYTHONPATH="$PYTHONPATH:/datasets/datasets/models"

The data_download.py command will download and preprocess the training and evaluation WMT datasets. Upon download and extraction, the training data is used to generate for what we will use as VOCAB_FILE variables. Effectively, the eval and training strings are tokenized, and the results are processed and saved as TFRecords.
NOTE: (per the official requirements): 1.75GB of compressed data will be downloaded. In total, the raw files (compressed, extracted, and combined files) take up 8.4GB of disk space. The resulting TFRecord and vocabulary files are 722MB. The script takes around 40 minutes to run, with the bulk of the time spent downloading and ~15 minutes spent on preprocessing.
python data_download.py --data_dir=/datasets/datasets/transformer
'PARAM_SET'
This specifies what model to train. 'big' or 'base'
IMPORTANT NOTE: The 'big' model will not work on most consumer grade GPU's such as RTX 2080 Ti, GTX 1080 Ti. If you need to train the 'big' model we recommend a system with at least 48 available GB GPU memory such as a Data Science Workstation equipped with the Quadro RTX 8000's, or 2 x Qudaro RTX 6000 with NVLink. Alternatively a TITAN RTX Workstation with 2x TITAN RTX (With NVLink Bridge) should also suffice. For this example, we're using an RTX 2080 Ti, so we select 'base'.
PARAM_SET=base
'DATA_DIR'
This variable should be set to where the training data is located.
DATA_DIR=$root/datasets/datasets/transformer
'MODEL_DIR'
This variable specifies the model location based on what model is specified in the 'PARAM_SET' variable
MODEL_DIR=$root/datasets/datasets/transformer/model_$PARAM_SET
'VOCAB_FILE'
This variable expresses where the location of the preprocessed vocab files are located.
VOCAB_FILE=$DATA_DIR/vocab.ende.32768
'EXPORT_DIR' Export trained transformer model
This will specify the location when/where you export the model in Tensorflow SavedModel format. This is done when using the flag export_dir when training in step 8.
EXPORT_DIR=$root/datasets/datasets/transformer/saved_model
The following command 'python transformer_main.py' will train the transformer for a total of 260,000 steps. See how the flags are set up to reference the variables you set in the previous steps. You can train for less than 260,000 steps, it's up to you.
NOTE: This will take a long time to train depending on your GPU resources. The official TensorFlow transformer model is under constant development, be sure to check periodically on their github for any latest optimizations and techniques to reduce training times.
python transformer_main.py --data_dir=$DATA_DIR --model_dir=$MODEL_DIR --vocab_file=$VOCAB_FILE --param_set=$PARAM_SET --bleu_source=$DATA_DIR/newstest2014.en --bleu_ref=$DATA_DIR/newstest2014.de --train_steps=260000 --steps_between_evals=1000 --export_dir=$EXPORT_DIR

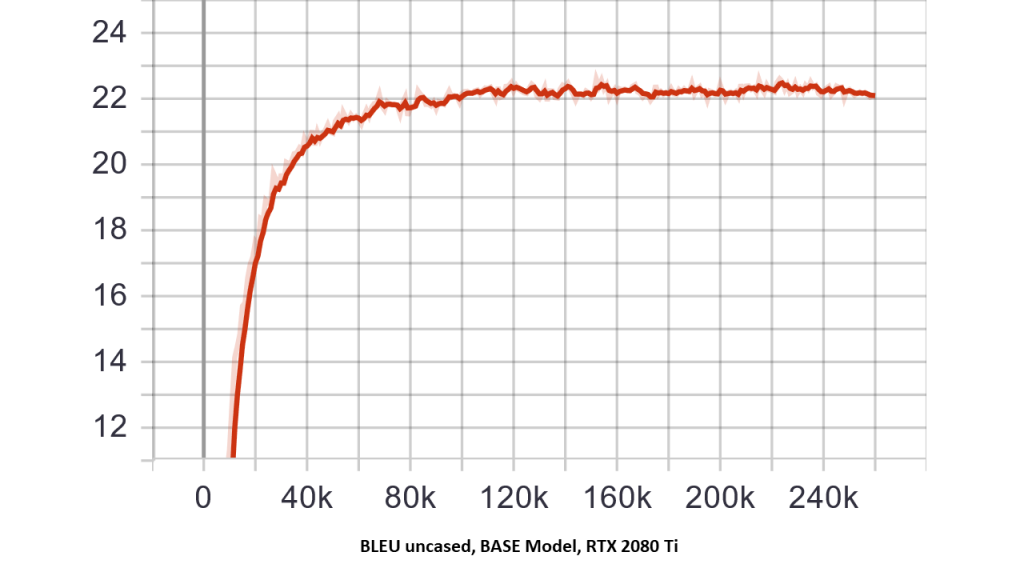
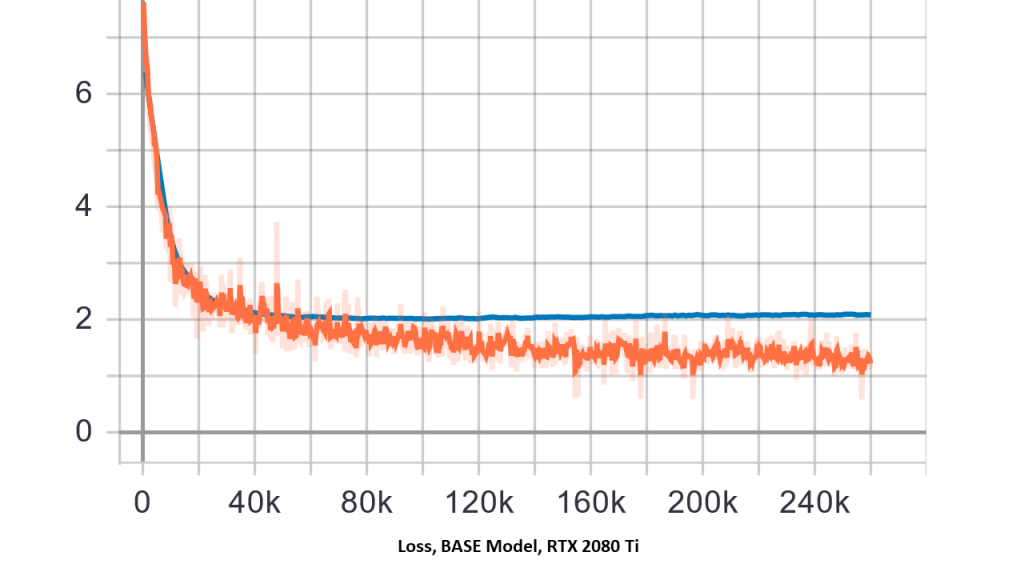
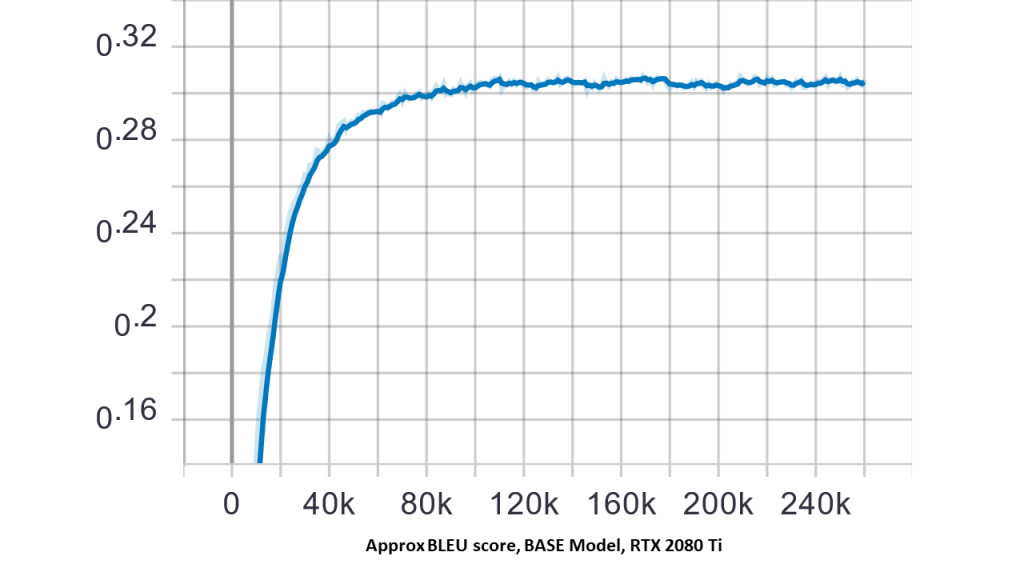
As we noted earlier, we can check the status of training in the Tensorboard GUI. To check in real time, run the following command in a separate terminal (or TensorFlow container), and type localhost:6007 in your browser to view Tensorboard. You can also wait until training is complete to use the current container.
tensorboard --logdir=$MODEL_DIR
You should see some outputs of the training similar to below.


Now we've trained our transformer network, let's enjoy the fruits of our labor using translate.py! In the command below, replace the text "hello world" with desired text to translate
python translate.py --model_dir=$MODEL_DIR --vocab_file=$VOCAB_FILE \
--param_set=$PARAM_SET --text="hello world"
I0411 18:05:23.619654 139653733598976 translate.py:150] Translation of "hello world": "Hallo Welt"
We've taken a look at transformer networks, how and why they are so effective. Currently the state of the art architecture, this area is an active area of NLP research. You should also now have a general idea of what it takes to train a transformer network For a deeper dive into training transformers visit the official transformer implementation in the TensorFlow github repo. We hope you've enjoyed this blog series, now get out there and build something awesome!

In part two of our series, "A Brief Description of How Transformers Work", we explained the technology behind the now infamous GPT-2 at a high level. For our third and final installment, we will dive head-first into training a transformer model from scratch using a TensorFlow GPU Docker image.
Training will be done on our Exxact Valence Workstation using a NVIDIA RTX 2080 Ti. Furthermore, we will create an English to German translator using the transformer model implementation located here on the official TensorFlow GitHub. Assuming you have all the necessary dependencies met for TensorFlow GPU, we provide a simple tutorial guide for getting started with transformers in docker.
Using Docker allows us to spin up a fully contained environment for our training needs. We always recommend using Docker, as it allows ultimate flexibility (and forgiveness) in our training environment. To begin we will open a terminal window and enter the following command to launch our NVIDIA CUDA powered container.
nvidia-docker run -it -p 6007:6006 -v /data:/datasets tensorflow/tensorflow:nightly-gpu bash
Note: A quick description about the key parameters of the above command (if you're unfamiliar with Docker).
| Docker Syntax | Description |
|---|---|
| nvidia-docker run | The 'docker run' command specifies the container from. Note in this case we use ‘nvidia-docker run’ to utilize CUDA powered NVIDIA GPUs. |
| -p 6007:6006 | Expose port 6007 [HOST:CONTAINER] for Tensorboard, type localhost:6007 in your browser to view Tensorboard |
| -v data:/datasets | Volume tag, This shares the folder '/data' on the host machine to the /datasets folder in the container. Also explained as: -v /[host folder]:/[container folder] |
| tensorflow/tensorflow:nightly-gpu | This the docker image that will run. The Docker Hub format is [PUBLISHER]/[IMAGE REPO]:[IMAGE TAG] |
This may be necessary if you are running a fresh docker container.
apt-get install git
In case you do not have the latest up-to-date codebase for the models, the transformer network model is included here and the devs tend to update it quite frequently.
git clone https://github.com/tensorflow/models.git
As a necessary step,this will install the python package requirements for training TensorFlow models.
pip install --user -r official/requirements.txt
Export PYTHONPATH to the folder where the models folder are located on your machine. The command below references where the models are located on our system. Be sure to replace the '/datasets/models' syntax with the data path to the folder where you stored/downloaded your models.
export PYTHONPATH="$PYTHONPATH:/datasets/datasets/models"
The data_download.py command will download and preprocess the training and evaluation WMT datasets. Upon download and extraction, the training data is used to generate for what we will use as VOCAB_FILE variables. Effectively, the eval and training strings are tokenized, and the results are processed and saved as TFRecords.
NOTE: (per the official requirements): 1.75GB of compressed data will be downloaded. In total, the raw files (compressed, extracted, and combined files) take up 8.4GB of disk space. The resulting TFRecord and vocabulary files are 722MB. The script takes around 40 minutes to run, with the bulk of the time spent downloading and ~15 minutes spent on preprocessing.
python data_download.py --data_dir=/datasets/datasets/transformer
'PARAM_SET'
This specifies what model to train. 'big' or 'base'
IMPORTANT NOTE: The 'big' model will not work on most consumer grade GPU's such as RTX 2080 Ti, GTX 1080 Ti. If you need to train the 'big' model we recommend a system with at least 48 available GB GPU memory such as a Data Science Workstation equipped with the Quadro RTX 8000's, or 2 x Qudaro RTX 6000 with NVLink. Alternatively a TITAN RTX Workstation with 2x TITAN RTX (With NVLink Bridge) should also suffice. For this example, we're using an RTX 2080 Ti, so we select 'base'.
PARAM_SET=base
'DATA_DIR'
This variable should be set to where the training data is located.
DATA_DIR=$root/datasets/datasets/transformer
'MODEL_DIR'
This variable specifies the model location based on what model is specified in the 'PARAM_SET' variable
MODEL_DIR=$root/datasets/datasets/transformer/model_$PARAM_SET
'VOCAB_FILE'
This variable expresses where the location of the preprocessed vocab files are located.
VOCAB_FILE=$DATA_DIR/vocab.ende.32768
'EXPORT_DIR' Export trained transformer model
This will specify the location when/where you export the model in Tensorflow SavedModel format. This is done when using the flag export_dir when training in step 8.
EXPORT_DIR=$root/datasets/datasets/transformer/saved_model
The following command 'python transformer_main.py' will train the transformer for a total of 260,000 steps. See how the flags are set up to reference the variables you set in the previous steps. You can train for less than 260,000 steps, it's up to you.
NOTE: This will take a long time to train depending on your GPU resources. The official TensorFlow transformer model is under constant development, be sure to check periodically on their github for any latest optimizations and techniques to reduce training times.
python transformer_main.py --data_dir=$DATA_DIR --model_dir=$MODEL_DIR --vocab_file=$VOCAB_FILE --param_set=$PARAM_SET --bleu_source=$DATA_DIR/newstest2014.en --bleu_ref=$DATA_DIR/newstest2014.de --train_steps=260000 --steps_between_evals=1000 --export_dir=$EXPORT_DIR
As we noted earlier, we can check the status of training in the Tensorboard GUI. To check in real time, run the following command in a separate terminal (or TensorFlow container), and type localhost:6007 in your browser to view Tensorboard. You can also wait until training is complete to use the current container.
tensorboard --logdir=$MODEL_DIR
You should see some outputs of the training similar to below.
Now we've trained our transformer network, let's enjoy the fruits of our labor using translate.py! In the command below, replace the text "hello world" with desired text to translate
python translate.py --model_dir=$MODEL_DIR --vocab_file=$VOCAB_FILE \
--param_set=$PARAM_SET --text="hello world"
I0411 18:05:23.619654 139653733598976 translate.py:150] Translation of "hello world": "Hallo Welt"
We've taken a look at transformer networks, how and why they are so effective. Currently the state of the art architecture, this area is an active area of NLP research. You should also now have a general idea of what it takes to train a transformer network For a deeper dive into training transformers visit the official transformer implementation in the TensorFlow github repo. We hope you've enjoyed this blog series, now get out there and build something awesome!
