Troubleshooting
Deploying Dynamic NFS Provisioning in Kubernetes
February 11, 2020
13 min read

The following documentation is intended to explain the procedure for deploying Dynamic NFS Provisioning in Kubernetes.
Dynamic NFS Provisioning: is allows storage volumes to be created on-demand. The dynamic provisioning feature eliminates the need for cluster administrators to code-provision storage. Instead, it automatically provisions storage when it is requested by users.
For a tutorial on Building a K8s Cluster using Vagrant visit: Building a Kubernetes Cluster using Vagrant
For a tutorial on Installing Helm Package Manager (Tiller) visit: Deploying Helm (Package Manager) in Kubernetes.
In this particular example, we'll allocate a local filesystem from which PersistenceVolume Claims can be made. We'll first create "/srv/nfs/kubedata"
[vagrant@kmaster ~]$ sudo mkdir /srv/nfs/kubedata -p
Change the ownership to "nfsnobody"
[vagrant@kmaster ~]$ sudo chown nfsnobody: /srv/nfs/kubedata/
Next, install the NFS-utils. This example is for centos 7
vagrant@kmaster ~]$ sudo yum install -y nfs-utils
Next, enable and start the userspace NFS server using systemctl.
[vagrant@kmaster ~]$ sudo systemctl enable nfs-server
Created symlink from /etc/systemd/system/multi-user.target.wants/nfs-server.service to /usr/lib/systemd/system/nfs-server.service.

[vagrant@kmaster ~]$ sudo systemctl start nfs-server

[vagrant@kmaster ~]$ sudo systemctl status nfs-server
● nfs-server.service - NFS server and services
   Loaded: loaded (/usr/lib/systemd/system/nfs-server.service; enabled; vendor codeset: disabled)
   Active: active (exited) since Sat 2019-11-02 22:06:49 UTC; 12s ago
Next, we need to edit the exports file to add the file system we created to be exported to remote hosts.
[vagrant@kmaster ~]$ sudo vi /etc/exports

/srv/nfs/kubedata    *(rw,sync,no_subtree_check,no_root_squash,no_all_squash,insecure)
Next, run the exportfs command to make the local directory we configured available to remote hosts.
[vagrant@kmaster ~]$ sudo exportfs -rav
exporting *:/srv/nfs/kubedata
If you want to see more details about our export file system, you can run "exportfs -v".
vagrant@kmaster ~]$ sudo exportfs -v
/srv/nfs/kubedata
        <world>(sync,wdelay,hide,no_subtree_check,sec=sys,rw,insecure,no_root_squash,no_all_squash)
Next, let's test the nfs configurations. Log onto one of the worker nodes and mount the NFS filesystem andverify.
[vagrant@kworker1 ~]$ sudo mount -t nfs 172.42.42.100:/srv/nfs/kubedata /mnt

[vagrant@kworker1 ~]$ mount | grep kubedata
172.42.42.100:/srv/nfs/kubedata on /mnt type nfs4 (rw,relatime,vers=4.1,rsize=262144,wsize=262144,namlen=255,hard,proto=tcp,timeo=600,retrans=2,sec=sys,clientaddr=172.42.42.101,local_lock=none,addr=172.42.42.100)
After verifying that NFS is configured correctly and working we can unmount the filesystem.
[vagrant@kworker1 ~]$ sudo umount /mnt)

Next, we'll configure a service account and role bindings. We'll use role-based access control to do the configuration. The first step is to download the NFS-provisioning repo and change into the NFS-provisioning directory.
git clone https://exxsyseng@bitbucket.org/exxsyseng/nfs-provisioning.git

cd nfs-provisioning
In this directory, we have 4 files. (class.yaml default-sc.yaml deployment.yaml rbac.yaml) We will use the rbac.yaml file to create the service account for NFS and cluster roles and bindings.
[vagrant@kmaster nfs-provisioning]$ kubectl create -f rbac.yaml
We can verify that the service account, clusterrole, and binding was created.
[vagrant@kmaster nfs-provisioning]$ kubectl get clusterrole,clusterrolebinding,role,rolebinding | grep nfs
clusterrole.rbac.authorization.k8s.io/nfs-client-provisioner-runner 20m
clusterrolebinding.rbac.authorization.k8s.io/run-nfs-client-provisioner 20m
role.rbac.authorization.k8s.io/leader-locking-nfs-client-provisioner 20m
rolebinding.rbac.authorization.k8s.io/leader-locking-nfs-client-provisioner 20m
Next, let's run the "class.yaml" to set up the storageclass. A storageclass provides a way for administrators to describe the “classes” of storage they offer.
Let's edit the "class.yaml" file and set both the storageclass name and the provisioner name.
apiVersion: storage.k8s.io/v1
kind: StorageClass
metadata:
name: managed-nfs-storage
provisioner: example.com/nfs
parameters:
archiveOnDelete: "false"
Once we've updated the class.yaml file we can execute the file using kubectl create
[vagrant@kmaster nfs-provisioning]$ kubectl create -f class.yaml
storageclass.storage.k8s.io/managed-nfs-storage created
Next, check that the storage class was created.
[vagrant@kmaster nfs-provisioning]$ kubectl get storageclass
NAME                  PROVISIONER       AGE
managed-nfs-storage   example.com/nfs   48s
Now let's deploy the NFS provisioner. But first we'll need to edit the deployment.yaml file. In this file, we'll need to specify the IP Address of our NFS Server (kmaster) 172.42.42.100.
kind: Deployment
apiVersion: apps/v1
metadata:
  name: nfs-client-provisioner
spec:
  selector:
    matchLabels:
      app: nfs-client-provisioner
  replicas: 1
  strategy:
    type: Recreate
  template:
    metadata:
      labels:
        app: nfs-client-provisioner
    spec:
      serviceAccountName: nfs-client-provisioner
      containers:
        - name: nfs-client-provisioner
          image: quay.io/external_storage/nfs-client-provisioner:latest
          volumeMounts:
            - name: nfs-client-root
              mountPath: /persistentvolumes
          env:
            - name: PROVISIONER_NAME
              value: example.com/nfs
            - name: NFS_SERVER
              value: 172.42.42.100
            - name: NFS_PATH
              value: /srv/nfs/kubedata
      volumes:
        - name: nfs-client-root
          nfs:
            server: 172.42.42.100
            path: /srv/nfs/kubedata
Once we've made the changes, save the file and apply the changes by running "kubectl create".
[vagrant@kmaster nfs-provisioning]$ kubectl create -f deployment.yaml
deployment.apps/nfs-client-provisioner created
After applying the changes, we should see a pod was created for nfs-client-provisioner.
[vagrant@kmaster nfs-provisioning]$ kubectl get all
NAME                                          READY   STATUS    RESTARTS   AGE
pod/nfs-client-provisioner-5b4f5775c7-9j2dw   1/1     Running   0          4m2s

NAME                 TYPE        CLUSTER-IP   EXTERNAL-IP   PORT(S)   AGE
service/kubernetes   ClusterIP   10.96.0.1    <none>        443/TCP   2d22h

NAME                                     READY   UP-TO-DATE   AVAILABLE   AGE
deployment.apps/nfs-client-provisioner   1/1     1            1           4m2s

NAME                                                DESIRED   CURRENT   READY   AGE
replicaset.apps/nfs-client-provisioner-5b4f5775c7   1         1         1       4m2s
We can run "kubectl describe" to see more details about the pod.
[vagrant@kmaster ~]$ kubectl describe pod nfs-client-provisioner-5b4f5775c7-9j2dw
Name:         nfs-client-provisioner-5b4f5775c7-9j2dw
Namespace:    default
Priority:     0
Node:         kworker2.example.com/172.42.42.102
Start Time:   Sun, 03 Nov 2019 20:11:51 +0000
Labels:       app=nfs-client-provisioner
              pod-template-hash=5b4f5775c7
Annotations:  cni.projectcalico.org/podIP: 192.168.136.65/32
Status:       Running
IP:           192.168.136.65
IPs:
  IP:           192.168.136.65
Controlled By:  ReplicaSet/nfs-client-provisioner-5b4f5775c7
Containers:
  nfs-client-provisioner:
    Container ID:   docker://95432ef4c256b48746b61f44a0292557b73abaced78342acafeae3c36681343b
    Image:          quay.io/external_storage/nfs-client-provisioner:latest
    Image ID:       docker-pullable://quay.io/external_storage/nfs-client-provisioner@sha256:022ea0b0d69834b652a4c53655d78642ae23f0324309097be874fb58d09d2919
    Port:           <none>
    Host Port:      <none>
    State:          Running
      Started:      Sun, 03 Nov 2019 20:11:56 +0000
    Ready:          True
    Restart Count:  0
    Environment:
      PROVISIONER_NAME:  example.com/nfs
      NFS_SERVER:        172.42.42.100
      NFS_PATH:          /srv/nfs/kubedata
    Mounts:
      /persistentvolumes from nfs-client-root (rw)
      /var/run/secrets/kubernetes.io/serviceaccount from nfs-client-provisioner-token-wgwct (ro)
Conditions:
  Type              Status
  Initialized       True
  Ready             True
  ContainersReady   True
  PodScheduled      True
Volumes:
  nfs-client-root:
    Type:      NFS (an NFS mount that lasts the lifetime of a pod)
    Server:    172.42.42.100
    Path:      /srv/nfs/kubedata
    ReadOnly:  false
  nfs-client-provisioner-token-wgwct:
    Type:        Secret (a volume populated by a Secret)
    SecretName:  nfs-client-provisioner-token-wgwct
    Optional:    false
QoS Class:       BestEffort
Node-Selectors:  <none>
Tolerations:     node.kubernetes.io/not-ready:NoExecute for 300s
                 node.kubernetes.io/unreachable:NoExecute for 300s
Events:          <none>
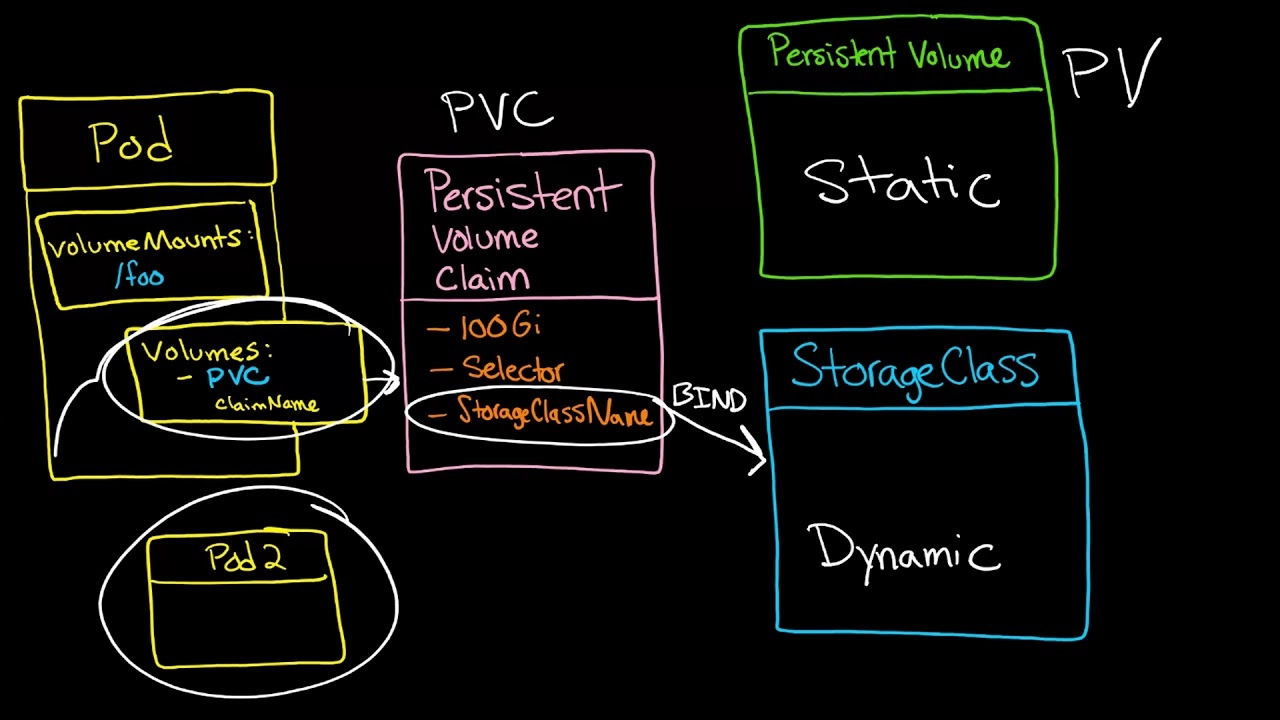
Persistent Volume Claims are objects that request storage resources from your cluster. They’re similar to a voucher that your deployment can redeem for storage access.
Persistent Volume is a resource that can be used by a pod to store data that will persist beyond the lifetime of the pod. It is a storage volume that in this case is a NFS volume.
If we check our cluster we'll see that there are currently no Persistent Volumes or Persistent Volume Claims.
[vagrant@kmaster ~]$ kubectl get pv,pvc
No resources found in default namespace.
Also, we can look in the directory we allocated for Persistent Volumes and see there nothing there.
[vagrant@kmaster ~]$ ls /srv/nfs/kubedata/
Let's create a PVC. Inside the nfs-provisioning repo, there is a file "4-pvc-nfs.yaml". In this example, we will allocate 500 MegaBytes.
apiVersion: v1
kind: PersistentVolumeClaim
metadata:
  name: pvc1
spec:
  storageClassName: managed-nfs-storage
  accessModes:
    - ReadWriteMany
  resources:
    requests:
      storage: 500Mi
We can create the PVC by running "kubectl create" against the 4-pvc-nfs.yaml" file.
[vagrant@kmaster nfs-provisioning]$ kubectl create -f 4-pvc-nfs.yaml
persistentvolumeclaim/pvc1 created
We can now view the PVC and PV that was allocated. As we can see below a PCV was created "persistentvolumeclaim/pvc1" and its bound to a PV "pvc-eca295aa-bc2c-420c-b60e-9a6894fc9daf". The PV was created automatically by the nfs-provisoner.
[vagrant@kmaster nfs-provisioning]$ kubectl get pvc,pv
NAME                         STATUS   VOLUME                                     CAPACITY   ACCESS MODES   STORAGECLASS          AGE
persistentvolumeclaim/pvc1   Bound    pvc-eca295aa-bc2c-420c-b60e-9a6894fc9daf   500Mi      RWX            managed-nfs-storage   2m30s

NAME                                                        CAPACITY   ACCESS MODES   RECLAIM POLICY   STATUS   CLAIM          STORAGECLASS          REASON   AGE
persistentvolume/pvc-eca295aa-bc2c-420c-b60e-9a6894fc9daf   500Mi      RWX            Delete           Bound    default/pvc1   managed-nfs-storage            2m30s
[vagrant@kmaster nfs-provisioning]$
Now that we have our nfs-provisoner working and we have both a PVC and OV that it is bound to. Let's create a pod to use our PVC. If we take a quick look at the existing pods we'll see that only the "nfs-client-provisioner" pod is running.
[vagrant@kmaster nfs-provisioning]$ kubectl get pods
NAME                                      READY   STATUS    RESTARTS   AGE
nfs-client-provisioner-5b4f5775c7-9j2dw   1/1     Running   0          4h36m
Next, we'll create a pod using the "4-busybox-pv-nfs.yaml" file. But first let's take a look at the file's contents.
apiVersion: v1
kind: Pod
metadata:
  name: busybox
spec:
  volumes:
  - name: host-volume
    persistentVolumeClaim:
      claimName: pvc1
  containers:
  - image: busybox
    name: busybox
    command: ["/bin/sh"]
    args: ["-c", "sleep 600"]
    volumeMounts:
    - name: host-volume
      mountPath: /mydata
We'll execute test-pod-pvc1.yaml using "kubectl create".
[vagrant@kmaster nfs-provisioning]$ kubectl create -f 4-busybox-pv-nfs.yaml
pod/busybox created
We can now see that the pod is up and running.
[vagrant@kmaster nfs-provisioning]$ kubectl get pods
NAME                                      READY   STATUS    RESTARTS   AGE
busybox                                   1/1     Running   0          69s
nfs-client-provisioner-5b4f5775c7-9j2dw   1/1     Running   0          7h33m
We can describe the pod to see more details.
[vagrant@kmaster nfs-provisioning]$ kubectl describe pod busybox
Name:         busybox
Namespace:    default
Priority:     0
Node:         kworker1.example.com/172.42.42.101
Start Time:   Mon, 04 Nov 2019 03:44:30 +0000
Labels:       <none>
Annotations:  cni.projectcalico.org/podIP: 192.168.33.194/32
Status:       Running
IP:           192.168.33.194
IPs:
  IP:  192.168.33.194
Containers:
  busybox:
    Container ID:  docker://f27b38404abbfd3ab77fe81b23e148e0a15f4779420ddfcb17eebcbe699767f3
    Image:         busybox
    Image ID:      docker-pullable://busybox@sha256:1303dbf110c57f3edf68d9f5a16c082ec06c4cf7604831669faf2c712260b5a0
    Port:          <none>
    Host Port:     <none>
    Command:
      /bin/sh
    Args:
      -c
      sleep 600
    State:          Running
      Started:      Mon, 04 Nov 2019 03:44:34 +0000
    Ready:          True
    Restart Count:  0
    Environment:    <none>
    Mounts:
      /mydata from host-volume (rw)
      /var/run/secrets/kubernetes.io/serviceaccount from default-token-p2ctq (ro)
Conditions:
  Type              Status
  Initialized       True
  Ready             True
  ContainersReady   True
  PodScheduled      True
Volumes:
  host-volume:
    Type:       PersistentVolumeClaim (a reference to a PersistentVolumeClaim in the same namespace)
    ClaimName:  pvc1
    ReadOnly:   false
  default-token-p2ctq:
    Type:        Secret (a volume populated by a Secret)
    SecretName:  default-token-p2ctq
    Optional:    false
QoS Class:       BestEffort
Node-Selectors:  <none>
Tolerations:     node.kubernetes.io/not-ready:NoExecute for 300s
                 node.kubernetes.io/unreachable:NoExecute for 300s
We can log into the container to view the mount point and create a file for testing
[vagrant@kmaster nfs-provisioning]$ kubectl exec -it busybox -- ./bin/sh
/ #
/ # ls /mydata/

/ # > /mydata/myfile

/ # ls /mydata/
myfile
Now that we've created a file called myfile, we can log into the mastrer node and verify the file by looking in the PV directory that was allocated for this pod.
[vagrant@kmaster nfs-provisioning]$ ls /srv/nfs/kubedata/default-pvc1-pvc-eca295aa-bc2c-420c-b60e-9a6894fc9daf/
myfile
[vagrant@kmaster nfs-provisioning]$ kubectl delete pod busybox
pod "busybox" deleted
[vagrant@kmaster nfs-provisioning]$ kubectl get pvc,pv
NAME                         STATUS   VOLUME                                     CAPACITY   ACCESS MODES   STORAGECLASS          AGE
persistentvolumeclaim/pvc1   Bound    pvc-eca295aa-bc2c-420c-b60e-9a6894fc9daf   500Mi      RWX            managed-nfs-storage   3h26m

NAME                                                        CAPACITY   ACCESS MODES   RECLAIM POLICY   STATUS   CLAIM          STORAGECLASS          REASON   AGE
persistentvolume/pvc-eca295aa-bc2c-420c-b60e-9a6894fc9daf   500Mi      RWX            Delete           Bound    default/pvc1   managed-nfs-storage            3h26m
[vagrant@kmaster nfs-provisioning]$ kubectl delete pvc --all
persistentvolumeclaim "pvc1" deleted
[vagrant@kmaster nfs-provisioning]$ kubectl get pvc,pv
No resources found in default namespace.
Dynamic NFS provisioning allows storage volumes to be created on-demand. Without dynamic NFS provisioning, cluster administrators have to manually create new storage volumes, and then create
PersistentVolumeobjects to recodesent them in Kubernetes. The dynamic NFS provisioning feature eliminates the need for cluster administrators to code-provision storage. Instead, it automatically provisions storage when it is requested by users.

The following documentation is intended to explain the procedure for deploying Dynamic NFS Provisioning in Kubernetes.
Dynamic NFS Provisioning: is allows storage volumes to be created on-demand. The dynamic provisioning feature eliminates the need for cluster administrators to code-provision storage. Instead, it automatically provisions storage when it is requested by users.
For a tutorial on Building a K8s Cluster using Vagrant visit: Building a Kubernetes Cluster using Vagrant
For a tutorial on Installing Helm Package Manager (Tiller) visit: Deploying Helm (Package Manager) in Kubernetes.
In this particular example, we'll allocate a local filesystem from which PersistenceVolume Claims can be made. We'll first create "/srv/nfs/kubedata"
[vagrant@kmaster ~]$ sudo mkdir /srv/nfs/kubedata -p
Change the ownership to "nfsnobody"
[vagrant@kmaster ~]$ sudo chown nfsnobody: /srv/nfs/kubedata/
Next, install the NFS-utils. This example is for centos 7
vagrant@kmaster ~]$ sudo yum install -y nfs-utils
Next, enable and start the userspace NFS server using systemctl.
[vagrant@kmaster ~]$ sudo systemctl enable nfs-server
Created symlink from /etc/systemd/system/multi-user.target.wants/nfs-server.service to /usr/lib/systemd/system/nfs-server.service.

[vagrant@kmaster ~]$ sudo systemctl start nfs-server

[vagrant@kmaster ~]$ sudo systemctl status nfs-server
● nfs-server.service - NFS server and services
   Loaded: loaded (/usr/lib/systemd/system/nfs-server.service; enabled; vendor codeset: disabled)
   Active: active (exited) since Sat 2019-11-02 22:06:49 UTC; 12s ago
Next, we need to edit the exports file to add the file system we created to be exported to remote hosts.
[vagrant@kmaster ~]$ sudo vi /etc/exports

/srv/nfs/kubedata    *(rw,sync,no_subtree_check,no_root_squash,no_all_squash,insecure)
Next, run the exportfs command to make the local directory we configured available to remote hosts.
[vagrant@kmaster ~]$ sudo exportfs -rav
exporting *:/srv/nfs/kubedata
If you want to see more details about our export file system, you can run "exportfs -v".
vagrant@kmaster ~]$ sudo exportfs -v
/srv/nfs/kubedata
        <world>(sync,wdelay,hide,no_subtree_check,sec=sys,rw,insecure,no_root_squash,no_all_squash)
Next, let's test the nfs configurations. Log onto one of the worker nodes and mount the NFS filesystem andverify.
[vagrant@kworker1 ~]$ sudo mount -t nfs 172.42.42.100:/srv/nfs/kubedata /mnt

[vagrant@kworker1 ~]$ mount | grep kubedata
172.42.42.100:/srv/nfs/kubedata on /mnt type nfs4 (rw,relatime,vers=4.1,rsize=262144,wsize=262144,namlen=255,hard,proto=tcp,timeo=600,retrans=2,sec=sys,clientaddr=172.42.42.101,local_lock=none,addr=172.42.42.100)
After verifying that NFS is configured correctly and working we can unmount the filesystem.
[vagrant@kworker1 ~]$ sudo umount /mnt)
Next, we'll configure a service account and role bindings. We'll use role-based access control to do the configuration. The first step is to download the NFS-provisioning repo and change into the NFS-provisioning directory.
git clone https://exxsyseng@bitbucket.org/exxsyseng/nfs-provisioning.git

cd nfs-provisioning
In this directory, we have 4 files. (class.yaml default-sc.yaml deployment.yaml rbac.yaml) We will use the rbac.yaml file to create the service account for NFS and cluster roles and bindings.
[vagrant@kmaster nfs-provisioning]$ kubectl create -f rbac.yaml
We can verify that the service account, clusterrole, and binding was created.
[vagrant@kmaster nfs-provisioning]$ kubectl get clusterrole,clusterrolebinding,role,rolebinding | grep nfs
clusterrole.rbac.authorization.k8s.io/nfs-client-provisioner-runner 20m
clusterrolebinding.rbac.authorization.k8s.io/run-nfs-client-provisioner 20m
role.rbac.authorization.k8s.io/leader-locking-nfs-client-provisioner 20m
rolebinding.rbac.authorization.k8s.io/leader-locking-nfs-client-provisioner 20m
Next, let's run the "class.yaml" to set up the storageclass. A storageclass provides a way for administrators to describe the “classes” of storage they offer.
Let's edit the "class.yaml" file and set both the storageclass name and the provisioner name.
apiVersion: storage.k8s.io/v1
kind: StorageClass
metadata:
name: managed-nfs-storage
provisioner: example.com/nfs
parameters:
archiveOnDelete: "false"
Once we've updated the class.yaml file we can execute the file using kubectl create
[vagrant@kmaster nfs-provisioning]$ kubectl create -f class.yaml
storageclass.storage.k8s.io/managed-nfs-storage created
Next, check that the storage class was created.
[vagrant@kmaster nfs-provisioning]$ kubectl get storageclass
NAME                  PROVISIONER       AGE
managed-nfs-storage   example.com/nfs   48s
Now let's deploy the NFS provisioner. But first we'll need to edit the deployment.yaml file. In this file, we'll need to specify the IP Address of our NFS Server (kmaster) 172.42.42.100.
kind: Deployment
apiVersion: apps/v1
metadata:
  name: nfs-client-provisioner
spec:
  selector:
    matchLabels:
      app: nfs-client-provisioner
  replicas: 1
  strategy:
    type: Recreate
  template:
    metadata:
      labels:
        app: nfs-client-provisioner
    spec:
      serviceAccountName: nfs-client-provisioner
      containers:
        - name: nfs-client-provisioner
          image: quay.io/external_storage/nfs-client-provisioner:latest
          volumeMounts:
            - name: nfs-client-root
              mountPath: /persistentvolumes
          env:
            - name: PROVISIONER_NAME
              value: example.com/nfs
            - name: NFS_SERVER
              value: 172.42.42.100
            - name: NFS_PATH
              value: /srv/nfs/kubedata
      volumes:
        - name: nfs-client-root
          nfs:
            server: 172.42.42.100
            path: /srv/nfs/kubedata
Once we've made the changes, save the file and apply the changes by running "kubectl create".
[vagrant@kmaster nfs-provisioning]$ kubectl create -f deployment.yaml
deployment.apps/nfs-client-provisioner created
After applying the changes, we should see a pod was created for nfs-client-provisioner.
[vagrant@kmaster nfs-provisioning]$ kubectl get all
NAME                                          READY   STATUS    RESTARTS   AGE
pod/nfs-client-provisioner-5b4f5775c7-9j2dw   1/1     Running   0          4m2s

NAME                 TYPE        CLUSTER-IP   EXTERNAL-IP   PORT(S)   AGE
service/kubernetes   ClusterIP   10.96.0.1    <none>        443/TCP   2d22h

NAME                                     READY   UP-TO-DATE   AVAILABLE   AGE
deployment.apps/nfs-client-provisioner   1/1     1            1           4m2s

NAME                                                DESIRED   CURRENT   READY   AGE
replicaset.apps/nfs-client-provisioner-5b4f5775c7   1         1         1       4m2s
We can run "kubectl describe" to see more details about the pod.
[vagrant@kmaster ~]$ kubectl describe pod nfs-client-provisioner-5b4f5775c7-9j2dw
Name:         nfs-client-provisioner-5b4f5775c7-9j2dw
Namespace:    default
Priority:     0
Node:         kworker2.example.com/172.42.42.102
Start Time:   Sun, 03 Nov 2019 20:11:51 +0000
Labels:       app=nfs-client-provisioner
              pod-template-hash=5b4f5775c7
Annotations:  cni.projectcalico.org/podIP: 192.168.136.65/32
Status:       Running
IP:           192.168.136.65
IPs:
  IP:           192.168.136.65
Controlled By:  ReplicaSet/nfs-client-provisioner-5b4f5775c7
Containers:
  nfs-client-provisioner:
    Container ID:   docker://95432ef4c256b48746b61f44a0292557b73abaced78342acafeae3c36681343b
    Image:          quay.io/external_storage/nfs-client-provisioner:latest
    Image ID:       docker-pullable://quay.io/external_storage/nfs-client-provisioner@sha256:022ea0b0d69834b652a4c53655d78642ae23f0324309097be874fb58d09d2919
    Port:           <none>
    Host Port:      <none>
    State:          Running
      Started:      Sun, 03 Nov 2019 20:11:56 +0000
    Ready:          True
    Restart Count:  0
    Environment:
      PROVISIONER_NAME:  example.com/nfs
      NFS_SERVER:        172.42.42.100
      NFS_PATH:          /srv/nfs/kubedata
    Mounts:
      /persistentvolumes from nfs-client-root (rw)
      /var/run/secrets/kubernetes.io/serviceaccount from nfs-client-provisioner-token-wgwct (ro)
Conditions:
  Type              Status
  Initialized       True
  Ready             True
  ContainersReady   True
  PodScheduled      True
Volumes:
  nfs-client-root:
    Type:      NFS (an NFS mount that lasts the lifetime of a pod)
    Server:    172.42.42.100
    Path:      /srv/nfs/kubedata
    ReadOnly:  false
  nfs-client-provisioner-token-wgwct:
    Type:        Secret (a volume populated by a Secret)
    SecretName:  nfs-client-provisioner-token-wgwct
    Optional:    false
QoS Class:       BestEffort
Node-Selectors:  <none>
Tolerations:     node.kubernetes.io/not-ready:NoExecute for 300s
                 node.kubernetes.io/unreachable:NoExecute for 300s
Events:          <none>
Persistent Volume Claims are objects that request storage resources from your cluster. They’re similar to a voucher that your deployment can redeem for storage access.
Persistent Volume is a resource that can be used by a pod to store data that will persist beyond the lifetime of the pod. It is a storage volume that in this case is a NFS volume.
If we check our cluster we'll see that there are currently no Persistent Volumes or Persistent Volume Claims.
[vagrant@kmaster ~]$ kubectl get pv,pvc
No resources found in default namespace.
Also, we can look in the directory we allocated for Persistent Volumes and see there nothing there.
[vagrant@kmaster ~]$ ls /srv/nfs/kubedata/
Let's create a PVC. Inside the nfs-provisioning repo, there is a file "4-pvc-nfs.yaml". In this example, we will allocate 500 MegaBytes.
apiVersion: v1
kind: PersistentVolumeClaim
metadata:
  name: pvc1
spec:
  storageClassName: managed-nfs-storage
  accessModes:
    - ReadWriteMany
  resources:
    requests:
      storage: 500Mi
We can create the PVC by running "kubectl create" against the 4-pvc-nfs.yaml" file.
[vagrant@kmaster nfs-provisioning]$ kubectl create -f 4-pvc-nfs.yaml
persistentvolumeclaim/pvc1 created
We can now view the PVC and PV that was allocated. As we can see below a PCV was created "persistentvolumeclaim/pvc1" and its bound to a PV "pvc-eca295aa-bc2c-420c-b60e-9a6894fc9daf". The PV was created automatically by the nfs-provisoner.
[vagrant@kmaster nfs-provisioning]$ kubectl get pvc,pv
NAME                         STATUS   VOLUME                                     CAPACITY   ACCESS MODES   STORAGECLASS          AGE
persistentvolumeclaim/pvc1   Bound    pvc-eca295aa-bc2c-420c-b60e-9a6894fc9daf   500Mi      RWX            managed-nfs-storage   2m30s

NAME                                                        CAPACITY   ACCESS MODES   RECLAIM POLICY   STATUS   CLAIM          STORAGECLASS          REASON   AGE
persistentvolume/pvc-eca295aa-bc2c-420c-b60e-9a6894fc9daf   500Mi      RWX            Delete           Bound    default/pvc1   managed-nfs-storage            2m30s
[vagrant@kmaster nfs-provisioning]$
Now that we have our nfs-provisoner working and we have both a PVC and OV that it is bound to. Let's create a pod to use our PVC. If we take a quick look at the existing pods we'll see that only the "nfs-client-provisioner" pod is running.
[vagrant@kmaster nfs-provisioning]$ kubectl get pods
NAME                                      READY   STATUS    RESTARTS   AGE
nfs-client-provisioner-5b4f5775c7-9j2dw   1/1     Running   0          4h36m
Next, we'll create a pod using the "4-busybox-pv-nfs.yaml" file. But first let's take a look at the file's contents.
apiVersion: v1
kind: Pod
metadata:
  name: busybox
spec:
  volumes:
  - name: host-volume
    persistentVolumeClaim:
      claimName: pvc1
  containers:
  - image: busybox
    name: busybox
    command: ["/bin/sh"]
    args: ["-c", "sleep 600"]
    volumeMounts:
    - name: host-volume
      mountPath: /mydata
We'll execute test-pod-pvc1.yaml using "kubectl create".
[vagrant@kmaster nfs-provisioning]$ kubectl create -f 4-busybox-pv-nfs.yaml
pod/busybox created
We can now see that the pod is up and running.
[vagrant@kmaster nfs-provisioning]$ kubectl get pods
NAME                                      READY   STATUS    RESTARTS   AGE
busybox                                   1/1     Running   0          69s
nfs-client-provisioner-5b4f5775c7-9j2dw   1/1     Running   0          7h33m
We can describe the pod to see more details.
[vagrant@kmaster nfs-provisioning]$ kubectl describe pod busybox
Name:         busybox
Namespace:    default
Priority:     0
Node:         kworker1.example.com/172.42.42.101
Start Time:   Mon, 04 Nov 2019 03:44:30 +0000
Labels:       <none>
Annotations:  cni.projectcalico.org/podIP: 192.168.33.194/32
Status:       Running
IP:           192.168.33.194
IPs:
  IP:  192.168.33.194
Containers:
  busybox:
    Container ID:  docker://f27b38404abbfd3ab77fe81b23e148e0a15f4779420ddfcb17eebcbe699767f3
    Image:         busybox
    Image ID:      docker-pullable://busybox@sha256:1303dbf110c57f3edf68d9f5a16c082ec06c4cf7604831669faf2c712260b5a0
    Port:          <none>
    Host Port:     <none>
    Command:
      /bin/sh
    Args:
      -c
      sleep 600
    State:          Running
      Started:      Mon, 04 Nov 2019 03:44:34 +0000
    Ready:          True
    Restart Count:  0
    Environment:    <none>
    Mounts:
      /mydata from host-volume (rw)
      /var/run/secrets/kubernetes.io/serviceaccount from default-token-p2ctq (ro)
Conditions:
  Type              Status
  Initialized       True
  Ready             True
  ContainersReady   True
  PodScheduled      True
Volumes:
  host-volume:
    Type:       PersistentVolumeClaim (a reference to a PersistentVolumeClaim in the same namespace)
    ClaimName:  pvc1
    ReadOnly:   false
  default-token-p2ctq:
    Type:        Secret (a volume populated by a Secret)
    SecretName:  default-token-p2ctq
    Optional:    false
QoS Class:       BestEffort
Node-Selectors:  <none>
Tolerations:     node.kubernetes.io/not-ready:NoExecute for 300s
                 node.kubernetes.io/unreachable:NoExecute for 300s
We can log into the container to view the mount point and create a file for testing
[vagrant@kmaster nfs-provisioning]$ kubectl exec -it busybox -- ./bin/sh
/ #
/ # ls /mydata/

/ # > /mydata/myfile

/ # ls /mydata/
myfile
Now that we've created a file called myfile, we can log into the mastrer node and verify the file by looking in the PV directory that was allocated for this pod.
[vagrant@kmaster nfs-provisioning]$ ls /srv/nfs/kubedata/default-pvc1-pvc-eca295aa-bc2c-420c-b60e-9a6894fc9daf/
myfile
[vagrant@kmaster nfs-provisioning]$ kubectl delete pod busybox
pod "busybox" deleted
[vagrant@kmaster nfs-provisioning]$ kubectl get pvc,pv
NAME                         STATUS   VOLUME                                     CAPACITY   ACCESS MODES   STORAGECLASS          AGE
persistentvolumeclaim/pvc1   Bound    pvc-eca295aa-bc2c-420c-b60e-9a6894fc9daf   500Mi      RWX            managed-nfs-storage   3h26m

NAME                                                        CAPACITY   ACCESS MODES   RECLAIM POLICY   STATUS   CLAIM          STORAGECLASS          REASON   AGE
persistentvolume/pvc-eca295aa-bc2c-420c-b60e-9a6894fc9daf   500Mi      RWX            Delete           Bound    default/pvc1   managed-nfs-storage            3h26m
[vagrant@kmaster nfs-provisioning]$ kubectl delete pvc --all
persistentvolumeclaim "pvc1" deleted
[vagrant@kmaster nfs-provisioning]$ kubectl get pvc,pv
No resources found in default namespace.
Dynamic NFS provisioning allows storage volumes to be created on-demand. Without dynamic NFS provisioning, cluster administrators have to manually create new storage volumes, and then create
PersistentVolumeobjects to recodesent them in Kubernetes. The dynamic NFS provisioning feature eliminates the need for cluster administrators to code-provision storage. Instead, it automatically provisions storage when it is requested by users.
