HPC
Basic GPU Troubleshooting Guide For a Devbox System
March 27, 2018
4 min read

Over the course of this guide we'll cover the basic troubleshooting steps for GPU issues concerning a devbox system.
This will cover the following issues:
- No video output from GPU
- Card not recognized by system (NVIDIA-smi or ISPCI)
- GPU(s) not powering on
- Single bad GPU vs bad PCIe lane
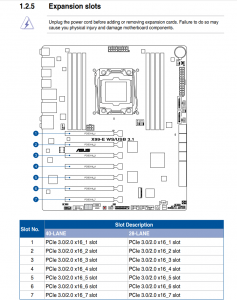
Most devboxes will use the same motherboard with the following layout:
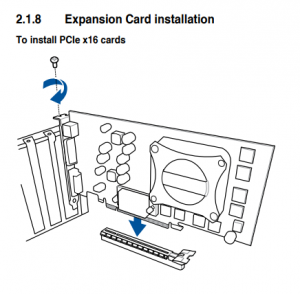
Most GPUs for the devbox will be dual-slot height and will require the cards to be staggered into slots 1, 3, 5, & 7 depending on the number of cards installed into the system.
Please note that all slots are PCIe x16 so in the event that a GPU needs to be transposed to another slot there will be no decrease in performance.
It is possible that during transport, the GPUs can become loose or dislodged from the PCIe slot. If a card is not visible in the system or is not powering on correctly, verify that the GPU is seated properly.
The GPU will have two points of anchoring, which will be the screw for the back I/O bracket and the retaining clip on the actual PCIe slot.
If both are secured properly, the I/O bracket shouldn't have any wiggle room and the retaining clip tab should be in the up position (not parallel with the mother board).
**Make sure that system is powered off and power cable is unplugged from system.**
To re-seat the GPU, remove the 6/8 pin PCIe power cable from the GPU.
Then remove the screw from the I/O bracket.
Push the retaining clip down towards the motherboard, which is the far right tab located on the PCIe slot.
Then gently rock the card side to side as you pull away from the motherboard. (Be sure not to rock too far as you may reengage the retaining clip.)
Once the GPU is removed inspect the contact pins and verify that they are not damaged.
When installing the card follow the guide in reverse. Note that when seating the card in the PCIe slot, the retaining clip should make an audible click. The tab should move into an upright position.
If all slots are occupied by GPUs it's best to remove them starting from slot 1 down to slot 7. This will be the only way to access the retaining clips during removal.
In the event that a GPU appears to be non-responsive, we will need to verify if it's the GPU that's the issue or if the PCIe lane has failed.
Depending on how many GPUs are installed it's best to isolate the suspected defective card and remove all other GPUs from the system.
With the single GPU, transpose the card to a slot other than its original installation location--preferably to a known working slot of another GPU.
If the issues persist after transposition, the issue is most likely the card.
If the GPU becomes responsive and is detected by the system, remove the isolated GPU, and replace it with one of the other known working GPUs.
Install the new GPU into the PCIe slot that the previous card had failed in. If the problem is replicated, this will most likely confirm a defective PCIe slot.
Should a GPU fail to power on, it may be necessary to confirm that PSU connections are seated properly or cables might need to be replaced.
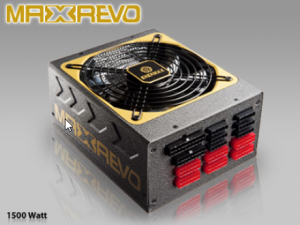
Most systems will have the following Enermax Modular Power Supply:
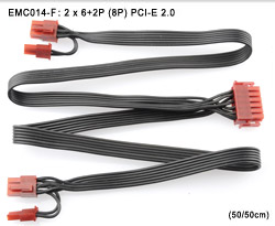
The cable used to connect the PSU to the GPU will be the following PCIe 6/8 pin cable:
Confirm that both ends are seated properly, from the GPU and the PSU end.
Both ends have retailing clips, which when properly seated will make an audible click and cannot be removed by pulling or wiggling the cable.
To remove the ends you will have to press and hold the retaining clip and while pulling the cable.
To confirm if the cable is defective, transpose to another port on the PSU end and power on the system. Should the issue persist, confirm by swapping out with another known working PCIe 6/8 pin cable.
Over the course of this guide we'll cover the basic troubleshooting steps for GPU issues concerning a devbox system.
This will cover the following issues:
- No video output from GPU
- Card not recognized by system (NVIDIA-smi or ISPCI)
- GPU(s) not powering on
- Single bad GPU vs bad PCIe lane
Most devboxes will use the same motherboard with the following layout:
Most GPUs for the devbox will be dual-slot height and will require the cards to be staggered into slots 1, 3, 5, & 7 depending on the number of cards installed into the system.
Please note that all slots are PCIe x16 so in the event that a GPU needs to be transposed to another slot there will be no decrease in performance.
It is possible that during transport, the GPUs can become loose or dislodged from the PCIe slot. If a card is not visible in the system or is not powering on correctly, verify that the GPU is seated properly.
The GPU will have two points of anchoring, which will be the screw for the back I/O bracket and the retaining clip on the actual PCIe slot.
If both are secured properly, the I/O bracket shouldn't have any wiggle room and the retaining clip tab should be in the up position (not parallel with the mother board).
**Make sure that system is powered off and power cable is unplugged from system.**
To re-seat the GPU, remove the 6/8 pin PCIe power cable from the GPU.
Then remove the screw from the I/O bracket.
Push the retaining clip down towards the motherboard, which is the far right tab located on the PCIe slot.
Then gently rock the card side to side as you pull away from the motherboard. (Be sure not to rock too far as you may reengage the retaining clip.)
Once the GPU is removed inspect the contact pins and verify that they are not damaged.
When installing the card follow the guide in reverse. Note that when seating the card in the PCIe slot, the retaining clip should make an audible click. The tab should move into an upright position.
If all slots are occupied by GPUs it's best to remove them starting from slot 1 down to slot 7. This will be the only way to access the retaining clips during removal.
In the event that a GPU appears to be non-responsive, we will need to verify if it's the GPU that's the issue or if the PCIe lane has failed.
Depending on how many GPUs are installed it's best to isolate the suspected defective card and remove all other GPUs from the system.
With the single GPU, transpose the card to a slot other than its original installation location--preferably to a known working slot of another GPU.
If the issues persist after transposition, the issue is most likely the card.
If the GPU becomes responsive and is detected by the system, remove the isolated GPU, and replace it with one of the other known working GPUs.
Install the new GPU into the PCIe slot that the previous card had failed in. If the problem is replicated, this will most likely confirm a defective PCIe slot.
Should a GPU fail to power on, it may be necessary to confirm that PSU connections are seated properly or cables might need to be replaced.
Most systems will have the following Enermax Modular Power Supply:
The cable used to connect the PSU to the GPU will be the following PCIe 6/8 pin cable:
Confirm that both ends are seated properly, from the GPU and the PSU end.
Both ends have retailing clips, which when properly seated will make an audible click and cannot be removed by pulling or wiggling the cable.
To remove the ends you will have to press and hold the retaining clip and while pulling the cable.
To confirm if the cable is defective, transpose to another port on the PSU end and power on the system. Should the issue persist, confirm by swapping out with another known working PCIe 6/8 pin cable.
