Deep Learning
Hands-on TensorFlow Tutorial: Train ResNet-50 From Scratch Using the ImageNet Dataset
March 26, 2019
9 min read

In this blog, we give a quick hands on tutorial on how to train the ResNet model in TensorFlow. While the official TensorFlow documentation does have the basic information you need, it may not entirely make sense right away, and it can be a little hard to sift through.
We present here a step by step process for training, while documenting best practices, tips, tricks, and even some challenges we encountered and eventually overcame while conducting the training process.
We cover everything you need to do, from launching TensorFlow, downloading and preparing ImageNet, all the way to documenting and reporting training. All experiments and training were done on a Exxact Valence Workstation utilizing 2 NVIDIA RTX 2080 Ti GPUs.
Yes, however this tutorial is a good exercise for training a large neural network from scratch, using a large dataset (ImageNet). While transfer learning is a wonderful thing, and you can download pre-trained versions of ResNet-50, here are some compelling reasons why you may want to go through this training exercise:
While transfer learning is a powerful knowledge-sharing technique, knowing how to train from scratch is still a must for deep learning engineers. So now, let's begin.
First and foremost, you'll want to launch your TensorFlow environment. We like to work with Docker, as it gives us ultimate flexibility and a reproducible environment. Pop open a terminal window and let's get started!
NOTE: Be sure specify your -v tag to create a interactive volume within the container.
nvidia-docker run -it -v /data:/datasets tensorflow/tensorflow:nightly-gpu bashOR if you plan to launch Tensorboard within the docker container, be sure to specify -p 6006:6006 and use the following command instead.
nvidia-docker run -it -v /data:/datasets -p 6006:6006 tensorflow/tensorflow:nightly-gpu bash
We decided to include this step, as it seems to cause a little confusion. NOTE: you'll want to make sure you have 300+ GB of storage space (as we found out) when you do this step, as the download & preprocess step requires this!
2.1) For the first substep you'll need to install 'git' if it's not part of your environment.
apt-get install git
2.2) Second, you must clone the TPU repo to your environment (No, we're not using Google's TPU, but essential preprocess scripts are contained here!)
git clone https://github.com/tensorflow/tpu.git
2.3) Third, you need to install the GCS dependencies (even if you're not using GCS, you still need to run this!)
pip install gcloud google-cloud-storage
2.4) Finally, you will need to run the imagenet_to_gcs.py script, which downloads the files from Image-Net.org and processes them into TFRecords but does not upload them to GCS (hence the 'nogcs_upload' flag) full options are here. Also 'local_scratch_dir=' should point to where you want to save the dataset.
python imagenet_to_gcs.py --local_scratch_dir=/data/imagenet --nogcs_upload
Note: ImageNet is HUGE, depending on your connection, it may take several hours (maybe overnight) to download the complete dataset!
This step is obvious, if you don't have the models, clone the repo using:
git clone https://github.com/tensorflow/models.git
Export PYTONPATH to the folder where the models folder are located on your machine. The command below is where the models were located on MY machine! Be sure to replace the '/datasets/models' syntax with the data path to your models folder!
export PYTHONPATH="$PYTHONPATH:/datasets/models"
Navigate to the models folder (if you're not already there) and run the following command
pip install --user -r official/requirements.txtor if your using Python3
pip3 install --user -r official/requirements.txt
IMPORTANT NOTE: You're almost ready to train! In our experience, in order for the training script to run properly, you need to copy (or move) the data from the validation folder and move it to the train folder!!!
Run the training script python imagenet_main.py and set training parameters. Below is what I used for training ResNet-50, 120 training epochs is very much overkill for this exercise, but we just wanted to push our GPUs. Depending on you're compute power, it may take several days to train on the full dataset!
python imagenet_main.py --data_dir=/data/imagenet/train --num_gpus= 2 --batch_size=64 --resnet_size= 50 --model_dir=/data/imagenet/trained_model/Resnet50_bs64 --train_epochs=120Note on training parameters: Note that there are many different options you can specify including:
| flag | description |
|---|---|
| data_dir | specifies location of training/validation data |
| num_gpus | specifies distribution strategy (number of GPUs you want to use to train the model set value to 0 to train on CPU) |
| batch_size | minibatch size |
| resnet_size | choose the size of the ResNet model (the example above is 50) |
| model_dir | choose where to store the trained model |
| train_epochs | number of training epochs to perform |
The above mentioned are only some of the options available for model training. See resnet_run_loop.py for the full list of options (you'll have to dig through the code).

You can also see your results using TensorBoard:
tensorboard --logdir=/data/imagenet/trained_model/Resnet50_bs64
If you ran the steps above correctly (and used similar parameters), you should have similar results below. Note, these results are on par with the official TensorFlow results. Let's see what you can do!
Accuracy
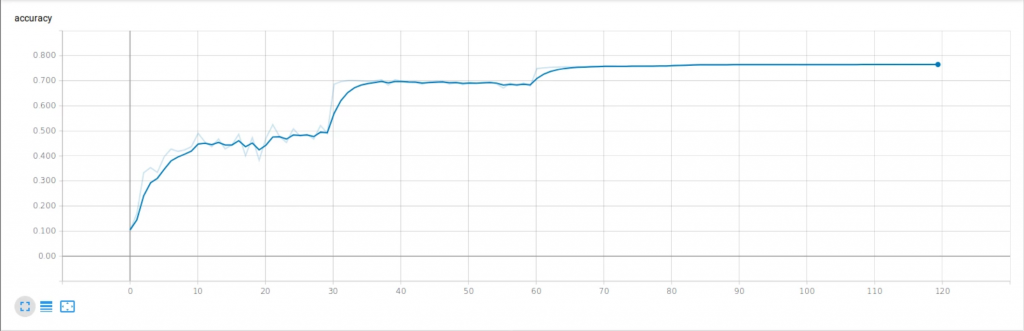
train_accuracy_1

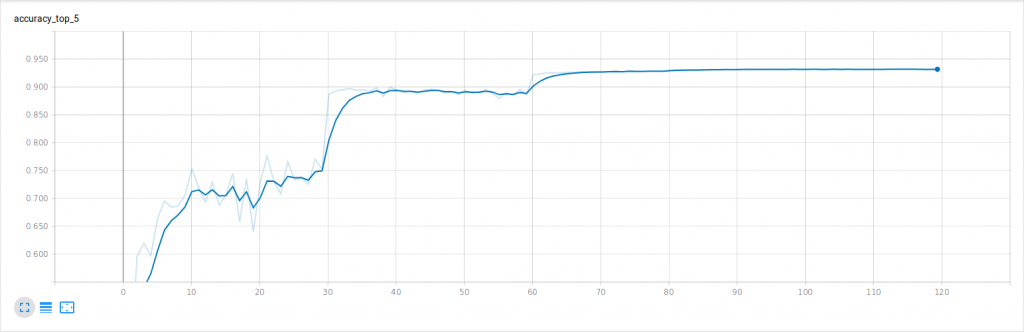
accuracy_top_5
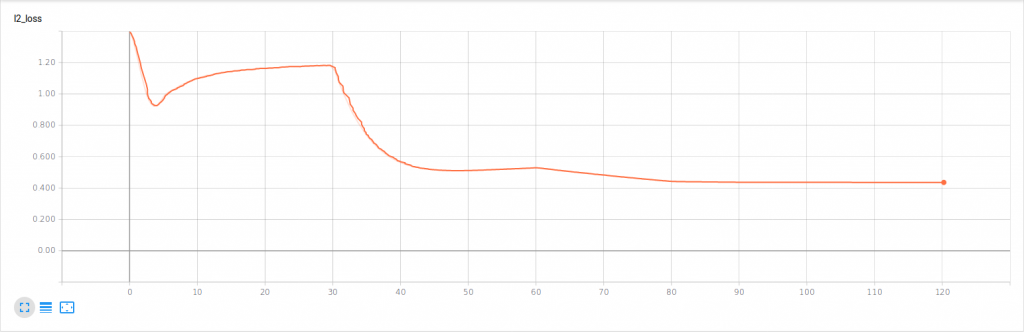
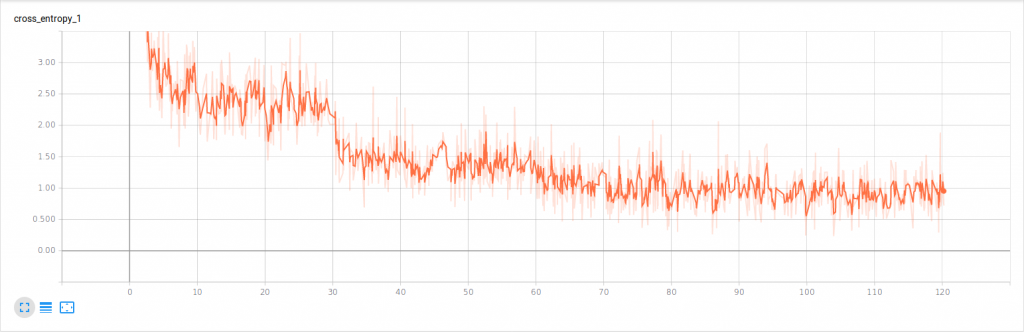
Loss

l2_loss
cross_entropy_1
| System | Exxact Valence Workstation |
| GPU | 2 x NVIDIA GeForce RTX 2080 Ti |
| CPU | Intel CORE I7-7820X 3.6GHZ |
| RAM | 32GB DDR4 |
| SSD | 480 GB SSD |
| HDD (data) | 10 TB HDD |
| OS | Ubuntu 18.04 |
| NVIDIA DRIVER | 410.79 |
| CUDA Version | 10 |
| Python | 2.7 |
| TensorFlow | 1.13 |
| Docker Image | tensorflow/tensorflow:nightly-gpu |
That's it, please let us know if you have any issues in training ResNet. Also, what tips and tricks do you use when training models in TensorFlow? Let us know on social media!
Facebook: www.facebook.com/exxactcorp
Twitter: www.twitter.com/exxactcorp
In this blog, we give a quick hands on tutorial on how to train the ResNet model in TensorFlow. While the official TensorFlow documentation does have the basic information you need, it may not entirely make sense right away, and it can be a little hard to sift through.
We present here a step by step process for training, while documenting best practices, tips, tricks, and even some challenges we encountered and eventually overcame while conducting the training process.
We cover everything you need to do, from launching TensorFlow, downloading and preparing ImageNet, all the way to documenting and reporting training. All experiments and training were done on a Exxact Valence Workstation utilizing 2 NVIDIA RTX 2080 Ti GPUs.
Yes, however this tutorial is a good exercise for training a large neural network from scratch, using a large dataset (ImageNet). While transfer learning is a wonderful thing, and you can download pre-trained versions of ResNet-50, here are some compelling reasons why you may want to go through this training exercise:
While transfer learning is a powerful knowledge-sharing technique, knowing how to train from scratch is still a must for deep learning engineers. So now, let's begin.
First and foremost, you'll want to launch your TensorFlow environment. We like to work with Docker, as it gives us ultimate flexibility and a reproducible environment. Pop open a terminal window and let's get started!
NOTE: Be sure specify your -v tag to create a interactive volume within the container.
nvidia-docker run -it -v /data:/datasets tensorflow/tensorflow:nightly-gpu bashOR if you plan to launch Tensorboard within the docker container, be sure to specify -p 6006:6006 and use the following command instead.
nvidia-docker run -it -v /data:/datasets -p 6006:6006 tensorflow/tensorflow:nightly-gpu bash
We decided to include this step, as it seems to cause a little confusion. NOTE: you'll want to make sure you have 300+ GB of storage space (as we found out) when you do this step, as the download & preprocess step requires this!
2.1) For the first substep you'll need to install 'git' if it's not part of your environment.
apt-get install git
2.2) Second, you must clone the TPU repo to your environment (No, we're not using Google's TPU, but essential preprocess scripts are contained here!)
git clone https://github.com/tensorflow/tpu.git
2.3) Third, you need to install the GCS dependencies (even if you're not using GCS, you still need to run this!)
pip install gcloud google-cloud-storage
2.4) Finally, you will need to run the imagenet_to_gcs.py script, which downloads the files from Image-Net.org and processes them into TFRecords but does not upload them to GCS (hence the 'nogcs_upload' flag) full options are here. Also 'local_scratch_dir=' should point to where you want to save the dataset.
python imagenet_to_gcs.py --local_scratch_dir=/data/imagenet --nogcs_upload
Note: ImageNet is HUGE, depending on your connection, it may take several hours (maybe overnight) to download the complete dataset!
This step is obvious, if you don't have the models, clone the repo using:
git clone https://github.com/tensorflow/models.git
Export PYTONPATH to the folder where the models folder are located on your machine. The command below is where the models were located on MY machine! Be sure to replace the '/datasets/models' syntax with the data path to your models folder!
export PYTHONPATH="$PYTHONPATH:/datasets/models"
Navigate to the models folder (if you're not already there) and run the following command
pip install --user -r official/requirements.txtor if your using Python3
pip3 install --user -r official/requirements.txt
IMPORTANT NOTE: You're almost ready to train! In our experience, in order for the training script to run properly, you need to copy (or move) the data from the validation folder and move it to the train folder!!!
Run the training script python imagenet_main.py and set training parameters. Below is what I used for training ResNet-50, 120 training epochs is very much overkill for this exercise, but we just wanted to push our GPUs. Depending on you're compute power, it may take several days to train on the full dataset!
python imagenet_main.py --data_dir=/data/imagenet/train --num_gpus= 2 --batch_size=64 --resnet_size= 50 --model_dir=/data/imagenet/trained_model/Resnet50_bs64 --train_epochs=120Note on training parameters: Note that there are many different options you can specify including:
| flag | description |
|---|---|
| data_dir | specifies location of training/validation data |
| num_gpus | specifies distribution strategy (number of GPUs you want to use to train the model set value to 0 to train on CPU) |
| batch_size | minibatch size |
| resnet_size | choose the size of the ResNet model (the example above is 50) |
| model_dir | choose where to store the trained model |
| train_epochs | number of training epochs to perform |
The above mentioned are only some of the options available for model training. See resnet_run_loop.py for the full list of options (you'll have to dig through the code).
You can also see your results using TensorBoard:
tensorboard --logdir=/data/imagenet/trained_model/Resnet50_bs64
If you ran the steps above correctly (and used similar parameters), you should have similar results below. Note, these results are on par with the official TensorFlow results. Let's see what you can do!
Accuracy
train_accuracy_1
accuracy_top_5
Loss
l2_loss
cross_entropy_1
| System | Exxact Valence Workstation |
| GPU | 2 x NVIDIA GeForce RTX 2080 Ti |
| CPU | Intel CORE I7-7820X 3.6GHZ |
| RAM | 32GB DDR4 |
| SSD | 480 GB SSD |
| HDD (data) | 10 TB HDD |
| OS | Ubuntu 18.04 |
| NVIDIA DRIVER | 410.79 |
| CUDA Version | 10 |
| Python | 2.7 |
| TensorFlow | 1.13 |
| Docker Image | tensorflow/tensorflow:nightly-gpu |
That's it, please let us know if you have any issues in training ResNet. Also, what tips and tricks do you use when training models in TensorFlow? Let us know on social media!
Facebook: www.facebook.com/exxactcorp
Twitter: www.twitter.com/exxactcorp
